Getting Started with React-Redux by making a Cart application


React Redux
Redux can be used with Angular as well. So we should not be confused if we see React Redux used very often.
Redux is a container where we can store our states. It is like an array where data of our application is stored.
Redux is called as a state management tool.
If you are familiar with useContext, in React wrap our components with a Context provider which let's ususe context correctly.
Similarly, for using Redux we wrap our components( will see about it in later portion of this blog) which allows us to directly control the state updates through Redux.
Redux Architecture
Following are the cyclic order of the redux component
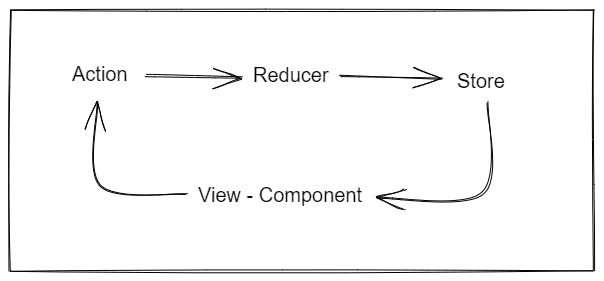
This flow keeps on going and is uni-directional which means that the direction will always be from View to Action to Reducer and Store and not in any other order.
View - This is a react component and we see it in our browser like cart items, buttons, button colour. On interacting with any element some action is initiated and Action block takes care of that.
Action - Once an action is initiated the Action block collects data from the component or API and sends it to the Reducer. Consider on clicking a button a list of movies is being shown on the screen but the information will come from an API, so in that case Action block will collect data from an API.
Reducer - Receives the data from Action block and Send to Store. Before sending it filters out the data received, like not sending the redundant data or data which is already available.
Store - This block has the state of the whole application. After receiving the informtion from Reducer it updates the specific state and send it to View block. One application will have only one Store, we cannot have two store blocks in a Redux application.
Installing Redux Library
Before installing make sure you npm and node installed in your system.
So for that use the following commands and enter it in your VS Code terminal.
npm -v
node -v
Create the React App
To use the Redux we need to have a React app as Redux is an advanced state management library. Write the following command and press Enter in your terminal.
npx create-react-app reduxtutorial.
. ensures the app will be created in the same directory instead of making a separate folder.
If you are running it first time use these commands before you enter npx create-app command
npm cache clean --force
npm install create-react-app -g
Installing React Redux
Now we have created our default React app, we will install Redux. Type the following in the terminal and press enter
npm i redux
This will install Redux. Now we will install React-Redux
npm i react-redux
Transferring props through components
After creating the React app, remove the un-necesarry lines are starter code.
After you are done with it, create a file name User.js
In user.js define a simple function and export it. Here is the code which I wrote
import React from 'react';

function User(props){
    const {data} = props;
    console.log(data)
    return <>
    <h1>Username {data.name}</h1>
    <h1>Age {data.age}</h1>
    </>
}


export default User;
Now import this in App.js file and pass down a simple prop to the User component. Here is the code for reference
import User from './User';
import './App.css';

function App() {
  const name = {
    name : 'Siddhant',
    age: 25
  }
  return (
    <div className="App">

      <User data = {name}/>
    </div>
  );
}

export default App;
This is the normal way how we transfer props in React. But the more the number of props the more drilling will be required and every component will update with every prop we pass. The moment our project becomes big this drilling will become complicated.
Working with Redux
In Redux, we will make separate folders of components, containers, service. Service will further contain action, reducers, constants.
This is done as we described earlier the cycle of Redux will always be followed.
Components will contain the code which will connect the service and components.
The actions and reducers role have been previosly discussed. Constant will be a file which will contain the code which maps the correct data to correct function and it will tell this to boeh actions and reducers.
After creating a folder, make a reducer.js and index.js file in the reducer folder. index.js will combine all the reducer files into one.
Create a actions.js file in actions folder and a reducer.js file in reducer folder.
Getting Components
In normal React function we use a component simply by improting it directly to the file we want to use that component in, read that again.
In Redux, we will import the component in the 'container' and then we will pass the component data to the required file.
Declare a simple Home.js in components folder like this
import React from 'react';

export default function Home(){
    return <>
    <h1>Home Component</h1>
    </>
}
Now create a file in containers folder. Name it HomeContainer.js
After creating the file import the Home.js in this file and export it as well. The code in HomeContainer.js will look like this
import Home from "../components/Home";

export default Home;
See how we exported the Home component as well.
Now import HomeContainer in App.js
import Home from './containers/HomeContainer'
Now use the Home in the App component.
So till now we saw how the flow will happen for components
It will be like this
Component -> Container -> App.js
Making a cart component in Home.js
We will add a simple product in our Home component. It will contain an image, a price and a button.
The code will look like this :
import React from 'react';

export default function Home(){
    return <>
    <div className=' cart'>
        <img src='https://th.bing.com/th/id/R.f85f50763e82aebba5baa290fa51e265?rik=43G0l3AMlwfnhw&riu=http%3a%2f%2fwww.pngmart.com%2ffiles%2f7%2fCart-PNG-Background-Image.png&ehk=IY2HqN0Zi8MoidlsUhTsOmoEoMsyWDUY7KjlrNXW4pQ%3d&risl=&pid=ImgRaw&r=0'></img>
    </div>
    <h1>Home Component</h1>
    <div className='cart-wrapper'>
        <div className='img-wrapper item'>
            <img src='https://clipart.info/images/ccovers/1505918647iphone-x-png.png'/>
        </div>
        <div className = 'text-wrapper item'>
            <span>
                iPhone
            </span>
            <span>
                Price: $1000.00
            </span>
        </div>
        <div className='btn-wrapper item'>
            <button>Add to Cart</button>
        </div>
    </div>
    </>
}
Our next task is to set up action file
Before working on the action.js file let us understand what is action
Action sends the data from our react components to the Redux store. This data can be from our prop or from any API. After that data is handled by Reducer.
Inside the action.js
For now define a function that will handle the data and will add to the cart. After that export it.
export const addToCart = (data) => {
    return{
        type: 'ADD_TO_CART',
        data:data
    }
}
You have noticed we used a 'type' in the return statement. type is very important for reducer to map the data.
For now we have declared a string 'ADD_TO_CART' but as our function will increase, changing it will become hectic.
What can be a solution to this problem?
The usual thing that we do. We created a constant.js file. We will create our type in that file and export it in our action.js file or any other file wherever we will need it.
Also keep in mind that we must maintain different 'type' for different functions.
Inside constant.js
Export the following code from constant.js
export const ADD_TO_CART = 'ADD_TO_CART';
Inside actions.js
Import the ADD_TO_CART from constant and use it in your type.
The updated code in actions.js will look like this
import { ADD_TO_CART } from "../constant"

export const addToCart = (data) => {
    return{
        type: ADD_TO_CART,
        data:data
    }
}
Our next task will be sending this data to reducer.
Reducer takes the data from the Action and pushes it inside the Store. In our simple app, on our button click from Home component, the button will call the action and action will get data from the Home component.
Action will then call the Reducer. Reducer will filter out the data and will then push it to store and store will send the updated value to our Home component.
Insider reducer.js
We need to define the initial value of the state.
Inside reducer.js write the following code
const initialState = {
    cartData: []
}

export default function cartItems(initialState,action){
    switch(action.type){

    }
}
The 'action' parameter does not needs to be imported.
switch statement is needed to decide the action of the reducer. The type that we specified inside the action action.js is used to decide the switch case.
The updated code will look like this after writing arguments for switch case
export default function cartItems(state = initialState,action){
    switch(action.type){
        case ADD_TO_CART:
                return{
                    ...state,
                    cartData:action.data
                }
                break;
        default:
                return state
    }
}
After this we will work on root reducer. The purpose of root reducer is to bind all the reducers for a single store.
Inside root reducer
We will combine the different reducers in the index.js file of reducer folder.
For combining the different reducers, we need to import the reducers and redux as well.
We will use combineReducer to mere all reducers.
import React  from "react";
import cartItems from "./reducer";
import {combineReducer} from 'redux';

export default combineReducer({
    cartItems
})
For our small project this will work for now. With more number of reducer, we will import them and will use a comma to put in argument of combineReducer like this
combineReducer({cartItems, users, loginIds})
Inside the container.js
Container file is very important as it connects the React and Redux functionalities.
Before moving forward know about these two functions:
mapDispatchtoProps -> Send data from React component to Redux store. It will contain function that in this blog we will define for a click event
mapStatetoProps -> Send data from store to wherever required in the app.
Now you know the functions it is wise to know that you can name them anything. These two functions are passed as parameter to connect function.
For now we will use the following code
import React from "react";
import {connect} from 'react-redux';
import {addToCart} from '../services/actions/actions'
import Home from "../components/Home";


const mapDispatchToProps = dispatch => ({
    handleAddToCart : data => dispatch(addToCart(data))
})

const mapStateToProps = state =>( {

})

export default connect(mapStateToProps, mapDispatchToProps)(Home);
We need to complete the Redux flow now.
Following is the process -
- Make a redux wrapper in index file
- Make a store
- Check data flow in console
- Call action on button click
working in index.js of React App
We will make two imports from redux and react-redux in this file.
One is Provider which will circulate the Redux data in the entire application.
Use the following code
import React from 'react';
import ReactDOM from 'react-dom/client';
import './index.css';
import App from './App';
import {createStore} from 'redux';
import {Provider} from 'react-redux';
import rootReducer from './services/reducer/index';

const store =createStore(rootReducer);
const root = ReactDOM.createRoot(document.getElementById('root'));

root.render(
  <React.StrictMode>
    <Provider store={store}>
    <App />
    </Provider>
  </React.StrictMode>
);
As you can see Provider wraps our and it takes a prop. Data is now flowing inside our app in form of store
console.log(store)
Use this in the index.js file and you will see the different parameters being passed through the app.
Passing the data onClick
In our Home.js file we mentioned a button which will add to cart on every click.
Since we have already declared the function in HomeContainer.js, reducer.js and actions.js we will add our handleAddToCart() function to the button onClick.
For now we will hardcode the data we will send on Click
<div className='btn-wrapper item'>
            <button
            onClick = {() =>
            {props.handleAddToCart({price:1000, name:'iPhone'})}}>Add to Cart</button>
        </div>
This data should go to action and reducer.
So we will put a console in both action and reducer to see this.
acions.js
export const addToCart = (data) => {
    console.warn('action ', data);
    return{
        type: ADD_TO_CART,
        data:data
    }
}
reducer.js
export default function cartItems(state = initialState,action){
    switch(action.type){
        case ADD_TO_CART:
            console.warn('reducer', action)
                return{
                    ...state,
                    cartData:action.data
                }
                break;
        default:
                return state
    }
}
All the data flow is being handled by Redux so don't worry. There is one difference between console of action and reducer.
In reducer we will get the type of the data as well.
// reducer console output
{
data: {price: 1000, name: 'iPhone'}
type: "ADD_TO_CART"
}
This 'type' let's switch statement decide which process to perform.
We left the state to blank in mapStateToProps. Now since our data is flowing it's time to write code inside it.
Inside mapStateToProps of HomeContainer.js
We will put our state as cartData. Reduc will do the rest for us.
const mapStateToProps = state =>( {
        cartData: state
})
After you will click on the button Add o Cart, only single item will be added everytime which means cart length will only be one. So in that case we need to pass an array to our prop.
This is a change you need to do in your reducer.js file
case ADD_TO_CART:
            console.warn('reducer', action)
                return[
                    ...state,
                    {cartData:action.data}
                ]
                break;
Notice how we are returning an array now instead of a single object.
Re-factoring our cart component
Redux allows smooth flowing of the data from one component to other component. Till now we have made the flow of data but have used only Home component.
In this section we will re factor our code and separate our cart component.
For that we will start by editing our HTML code in Home.js to show the props length
<div className=' cart'>
        <img src='https://th.bing.com/th/id/R.f85f50763e82aebba5baa290fa51e265?rik=43G0l3AMlwfnhw&riu=http%3a%2f%2fwww.pngmart.com%2ffiles%2f7%2fCart-PNG-Background-Image.png&ehk=IY2HqN0Zi8MoidlsUhTsOmoEoMsyWDUY7KjlrNXW4pQ%3d&risl=&pid=ImgRaw&r=0'></img>
        <span>{props.cartData.cartItems.length}</span>
    </div>
Now we have a number that will show the number of items added in our cart.
Make a separate file and name it Cart.js
The Cart.js will have a simple image and span element like we wrote earlier and will export it.
import React from "react";

export default function Cart(props){
    console.warn('Cart ', props)
    return <>
    <div className=' cart'>
        <img src='https://th.bing.com/th/id/R.f85f50763e82aebba5baa290fa51e265?rik=43G0l3AMlwfnhw&riu=http%3a%2f%2fwww.pngmart.com%2ffiles%2f7%2fCart-PNG-Background-Image.png&ehk=IY2HqN0Zi8MoidlsUhTsOmoEoMsyWDUY7KjlrNXW4pQ%3d&risl=&pid=ImgRaw&r=0'></img>
        <span>{props.cartData.cartItems.length}</span>
    </div>
    </>
}
The CSS code will be added at the end of the blog.
Now we will make a separae container for our Cart component.
import React from "react";
import {connect} from 'react-redux';
import Cart from "../components/Cart";


const mapDispatchToProps = dispatch => ({

})

const mapStateToProps = state =>( {
        cartData: state
})

export default connect(mapStateToProps, mapDispatchToProps)(Cart);
Now you will see that we don't need anything in the dispatch. This is because we don't have to perform any operation in Cart component.
The cartData is still needed so we will keep it as it is.
Using our CartContainer.js
There are two ways to use the CarContainer now. We will not use the Cart component but instead like we used the HomeContainer in our index.js file we will use the CartContainer.
- Method - 1 : importing the file in App.js
Simply import the CartContainer in App.js and use it. It will work correctly.
import HomeContainer from './containers/HomeContainer'
import CartContainer from './containers/CartContainer';
function App() {

  return (
    <div className="App">
      <CartContainer/>
      <HomeContainer/>
    </div>
  );
}

export default App;
There is other method which I find better because often we call components inside components and knowing that we only need to import the CartContainer anywhere we will import in inside our Home component only.
- Method -2 importing the file in Home.js
import CartContainer from '../containers/CartContainer';


export default function Home(props){
    console.warn('Home ', props)


    return <>
    <CartContainer/>
    <h1>Home Component</h1>
...
...
... further code will remain the same
We have now created a full functional React-Redux app. Since we have not made a remove from cart feature.
This is how you will do it
- Create a function in actions.js
- Create a key 'REMOVE_FROM_CART'
- Create button in Home.js and add an onClick remove from Cart function.
The code for these functionalities are below
actions.js
import React from "react"
import {REMOVE_FROM_CART, ADD_TO_CART } from "../constant"

export const addToCart = (data) => {
    console.warn('action ', data);
    return{
        type: ADD_TO_CART,
        data:data
    }
}


export const removeFromCart = () => {
    return {
        type: REMOVE_FROM_CART,

    }
}
reducer.js
import { REMOVE_FROM_CART,ADD_TO_CART } from "../constant"


export default function cartItems(state = [],action){
    switch(action.type){
        case ADD_TO_CART:
            console.warn('reducer', action)
                return[
                    ...state,
                    {cartData:action.data}
                ]
                break;
        case REMOVE_FROM_CART:
            return state.slice(0, state.length -1)
        default:
                return state
    }
}
constant.js
export const ADD_TO_CART = 'ADD_TO_CART';
export const REMOVE_FROM_CART = 'REMOVE_FROM_CART';
HomeContainer.js
import React from "react";
import {connect} from 'react-redux';
import {removeFromCart,addToCart} from '../services/actions/actions'
import Home from "../components/Home";


const mapDispatchToProps = dispatch => ({
    handleAddToCart : data => dispatch(addToCart(data)),
    handleRemoveFromCart : data => dispatch(removeFromCart(data))
})

const mapStateToProps = state =>( {
        cartData: state
})

export default connect(mapStateToProps, mapDispatchToProps)(Home);
Home.js
<div className='btn-wrapper item'>
            <button
            onClick = {
                () => {props.handleRemoveFromCart();}
                }>Remove Item</button>
        </div>
Now this completes our React-Redux blog. Thanks to Code Step By Step
Here is the CSS code for the project
.cart-wrapper{
  width: 90%;
  position: relative;
  display: flex;
  margin: 2rem;
  margin-right: 3rem;
  padding-right: 1rem;
  align-items: center;
  justify-content: space-around;
 border: 1px solid rgb(212, 212, 212);
 border-radius: 0.3rem;
}

.cart span{
  text-align: center;
  vertical-align: middle;
  width: 1.25rem;
  height: 1.25rem;
  position: absolute;
  right: 0;
  margin: 1rem;
  background-color: red;
  border-radius: 50%;
  padding: 0.05rem;
  transform: translate(25%, 50%);

}
.cart img{
  width: 2rem;
  height: auto;
  position: absolute;
  right: 0;
  margin: 1rem;
}

.img-wrapper img{

  width: 12rem;
  height: 10rem;
}

.btn-wrapper{
  padding-left: 1rem;
}